My 4G setup for working remotely from anywhere
In this post, I will share details of my 4G setup and show how you can build a similar setup for working from remote locations.
Intro
After getting locked in for almost 2 years due to COVID-19, I wanted to spend time with nature, away from busy city life, and breath fresh air. My parents own a farm, so it felt like a perfect place to spend a few weeks. The only issue is that I don’t have wired internet connectivity in the Farm (kinda obvious when we think about it).
The only way to access the internet is over 4G. We get good signal from Airtel & Jio. On mobile phone we were getting around 10-15 Mbps speed but it was not stable (had high ping (>100ms), and jitter(>50ms) which is not good for video calls). Another issue was that speed would sometimes drop down to 1-3 Mbps.
Good enough for basic browsing but NOT good enough to make video calls, share screen and present something to folks on the other side of the world.
Initial research
I started looking into options and found out about microwave Internet (wireless broadband connection delivered by high capacity microwave radio link). Had a chat with a microwave internet company in the area, and abandoned the plan right after looking at the quote. I needed a microwave tower and expensive radios for this setup.

This was too much money for me, I was not ready to spend this much money to work from a farm a few days a year. I wanted a cheap setup that can provide stable 4G internet for a few weeks.
I started reading up and researching ways to get better signals and stabilize the existing 4G connection. I was look for setup that can provide stable connection with decent ping, and jitter and hopefully better and stable network speeds.
I started looking into how the whole telecom infrastructure works. I came across signal boosting products (which are not legal in India unless installed by network providor for you) for remote areas, I saw videos of folks using external antennas with 4G pocket routers to get better internet in RVs.
Around the same time, someone in the Remote Indian community posted about how they are using a 4G router with a cheap external dipole antenna to work from hills.
That post gave me a direction to research, and I started looking into using a 4G router with external antennas.
I started looking into different antenna types, what they do, how they work, and what different units and abbreviations mean. To be honest, half of the things were hard to understand, I was frantically googling while watching the videos and reading blog posts to understand things.
I am trying to explain things in easy to understand words in this blog post, check out this playlist to go down the rabbit hole
Telecom and Communication Basics
Let’s take a little detour into telecom infrastructure to get an idea of how it all works. Feel free to skip this section, this section is for those who want to know details.
I will keep things short, so please refer to the attached sources for more details
Cellular networks have cell towers (also known as cell-site or telecom base station) that host antennas, mostly mounted at high places.
To find these towers/base stations around you, checkout cellmapper.net or Network Cell Info Lite app.
Later we will use the Network Cell Info Lite app to do the site survey, so install and play around with the app.
Bands and Frequency Range
1, 3, 5, 8, 40 are some of the bands used by networks in India, See this table for more details about cell Network Bands and frequency ranges.
For Indian spectrum allocations, I found https://onlytech.com/india-telecom-spectrum-chart/ helpful and easy to understand.
Low Band number means Lower frequency ranges (850MHz range), and it increases as we go up the band number. Band 40 usually operates in the 2100MHz / 2300MHz range in India.
The actual frequency range depends on the network provider, and the spectrum ranges they are allowed to operate by regulatory bodies.
The only thing we need to know about bands is that lower bands can travel far distances and cover a lot more area but the bandwidth is low.
High band numbers can NOT travel very far compared to low bands but they have high bandwidth.
You can think of bandwidth as pipe, so low bands are narrow pipes that can go to kilometers, and higher bands are wide pipes that don’t go as far compared to narrow pipes.
NOTE: availability of bands and frequency ranges will vary based on your location, and cell service provider. Check details of bands and frequency ranges in your country and area.
Terms and Units of Measurements
We will see some 3 letter abbreviations in mobile network literature and the Network Cell Info Lite app. Don’t worry about understanding what they are, and what they mean, we just need to take readings and don’t need to know the details.
Cell Identifiers:
- MCC: Mobile country code
- MNC: Mobile Network Code
- Band: Frequency range, see more
- TAC: Tracking Area Code
- ECI: E-UTRAN Cell Identity
- PCI: Physical Cell Identifiers
See more: LTE Numbering & Addressing
Signal Quality:
- RSRP: Reference Signal Received Power
- RSRQ: Reference Signal Received Quality
- RSSNR: Reference Signal Signal to Noise Ratio
- ASU: Arbitrary Strength Unit
- Power: Power of the signal
Units:
- dB: decibel, used to measure the power of the signal
- dBm: decibel-milliwatts, same as dB but a smaller unit
- MHz: megahertz
- fW: femtowatt, like Watt but way smaller (1 Watt = 1.0E+15 fW)
- dBi: dB(isotropic), The forward gain of an antenna, measured in decibels (dBi)
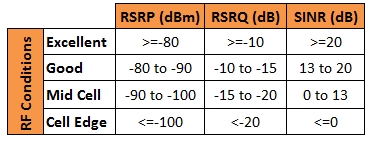
How do we know if we have good signal?
A good signal will have a low Signal to Noise Ratio (RSSNR/ SINR), and High Power (RSRP / RSRQ)
We can use this table to check if we have a quality signal:
Site Survey
Before selecting antenna and other equipment we need to know the signal quality in our target installation area. We need this data to spec out the antenna, and find the best location/direction to mount our antenna.
To collect data about the quality of signal in target area, we will do a Site Survey.
Don’t worry, it’s quite easy. If I can do this, anyone can do this. Site Survey is just a fancy way of saying “Install an app and roam around to find the spot with the best signal”
Go and download the Network Cell Info Lite app on an Android Phone. This app is free on the Play Store, I don’t own an iOS device so you are on your own if you don’t have an Android device.
After Installing, Open, and give it required permissions.
To start the Site Survey, Open the Network Cell Info Lite app, and go to the target location (the area where you want to mount your antenna).
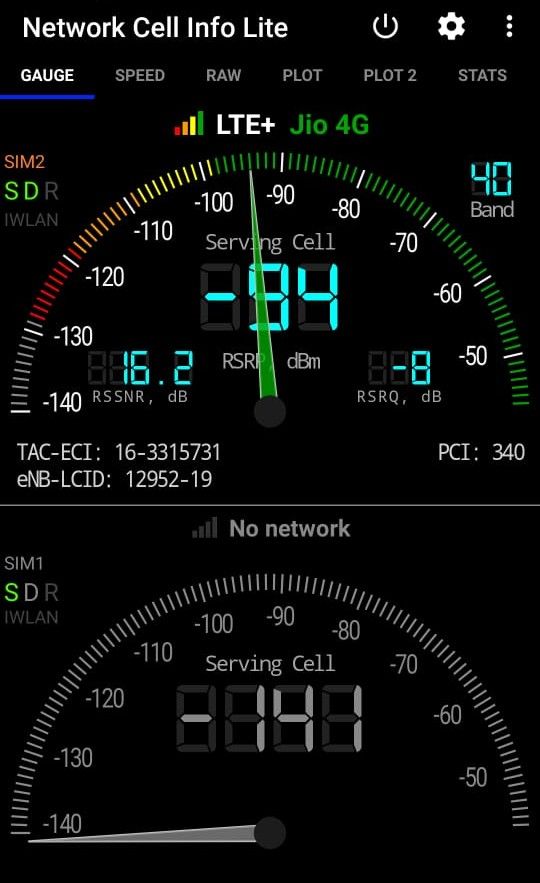
Move around and take note of signal quality metrics like RSRP, RSRQ, RSSNR, and Bands available.
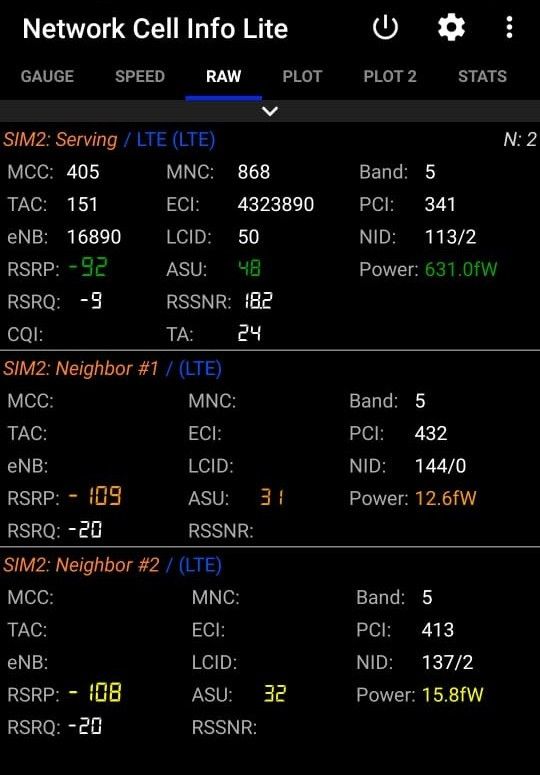
You can switch to RAW tab in app to see all the cell towers around you, and more details about them.
In the RAW tab, “Serving” indicates the cell tower you are connected to and being served by right now. The serving cell tower will show Cell Identifiers along with signal metrics. Below the Serving cell, you will see other cell towers in the area and their signal strength.
Switch back to the Home tab, try moving around, changing direction, going at height, and finding a spot with the best signal. The place with best signal is the ideal location for mounting your antennas.
Note down signal quality metrics like RSRP, RSRQ, RSSNR, and Bands available at that spot. We will use these values to spec our antenna.
If you have SIM cards from different network providers, repeat the site survey with all the SIM cards to find and select the best network provider for your location.
Here are some screenshots from a site survey:
You want to mount your antenna in the areas that have high RSRP (more than -80 dBm is great), High RSRQ (more than -10 is good), and High RSSNR, a positive value of SNR is considered good, and anything above 10 is great. higher SNR means the signal has low noise, and you have a stable signal.
Note: SNR can change with the weather or due to noise from other signal sources nearby. Mount your antenna in a place that’s isolated from noise. High voltage power lines, electric motors, or generators can be the source of the noise.
Finalizing Equipment
4G Router / Modem
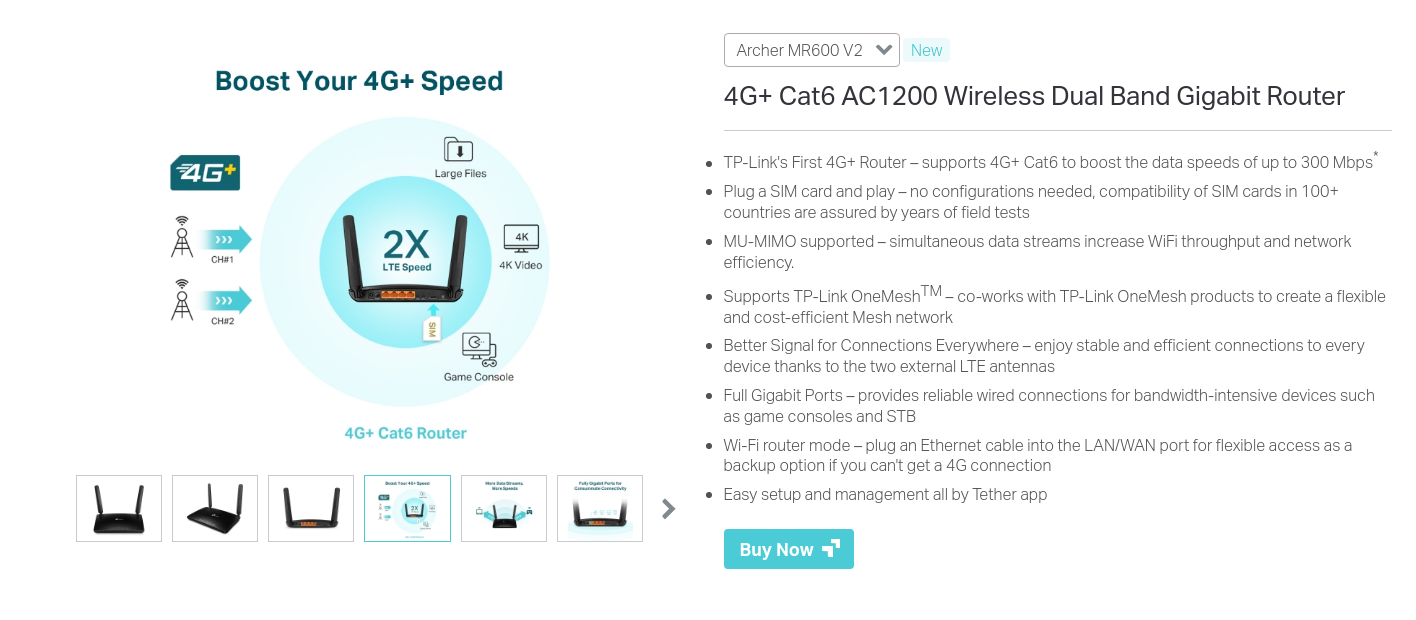
We will need a 4G router/modem that supports two external antennas and has MIMO (Multiple Input Multiple Output) support. Routers with MIMO can use two separate antennas at once to deliver fast speeds.
I used TP-Link Archer MR600 AC1200 in my setup because you can connect two external antennas, and it has MIMO capability. I got it from Amazon India.
TP-Link MR600 has MU-MIMO support, and Carrier Aggregation support.
Make sure your router that has an ethernet port, you want to go wired for a better experience, For low latency applications like video calls, wired connections are better than using wifi.
My router has full gigabit ethernet ports, and I connect my laptop using an ethernet cable.
Any router that has these features will work fine, just make sure to get the right type of connectors and cables for your router.
Here are the full specifications (pdf) of my TP-Link MR600 Router.
Antennas
Two types of antenna can be used as the external antenna in a 4G Router. Omni-directional or directional antenna. You need to pick a type based on your use case.
rule of thumb is:
- If your setup is movable and you don’t want to adjust the antenna, you can use an Omnidirectional antenna.
- If your setup is fixed, then it’s better to use a directional antenna, they will give better results.
weBoost has a great explanation of these types of antenna, also folks from WilsonPro have another good video on Yagi vs Omni Antennas.
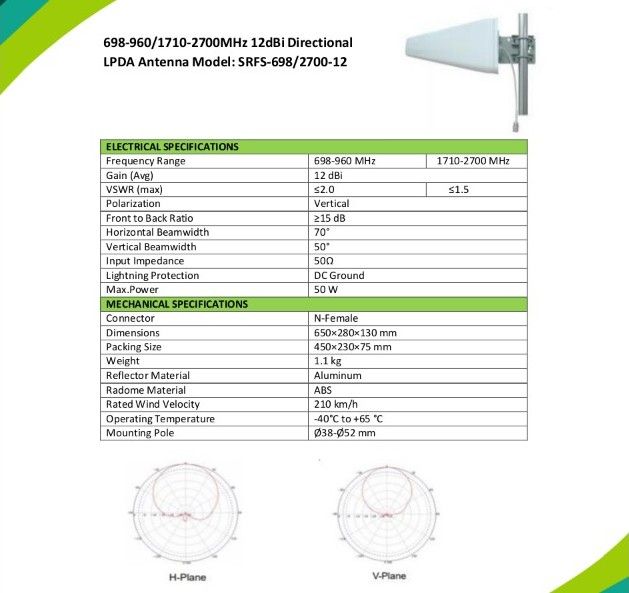
My setup was fixed so I used two directional LPDA Antennas with 12dbi gain, and frequency range for my anteena is 698-960Mhz and 1710-2700 Mhz.
This frequency range is used by LTE networks in India.
The gain was calculated based on the readings in our Site Survey, as per my calculations 12dbi gain antenna was enough for me.
To find gain for your antenna, you need the RSRP value from the location where you will mount your antenna and subtract it from your desired RSRP value and then the difference is the gain you need in your antenna.
(-80) dBm RSRP is considered a great value for RSRP so we can take that as desired RSRP value.
For example, If the site survey shows -94 dBm RSRP, you will need an antenna with 14dBi gain to have -80dBm after using that antenna. (-80) - (-94) = 14 dBi gain antenna is required
In real life, the actual gain might be slightly less than the rated gain due to signal loss in cables.
Here is the spec sheet (pdf) for my LPDA antennas:
I bought two antennas and two 15 meter cables from a supplier (signityrfsolutions) on indiamart.com.
You can find these antennas and cables on Amazon India as well.
Cables and Connectors
I used low-loss LMR 400 Cables to connect my antenna with the router, Low loss cables are desired in this setup to reduce signal loss.
LMR 400 cable is used for low-loss communications (rated: loss of 0.223 dB/meter @ 2.4 GHz). Any low-loss cable is fine for this setup, KMR 400 cable also works fine for this setup.
My antennas have an N-female connector, my cables had N-male on one side, and SMA-male connectors.
My 4G router has SMA-female connections for external antennas.
My cables were already crimped, and connectors were attached. I suggest buying cables with connectors installed.
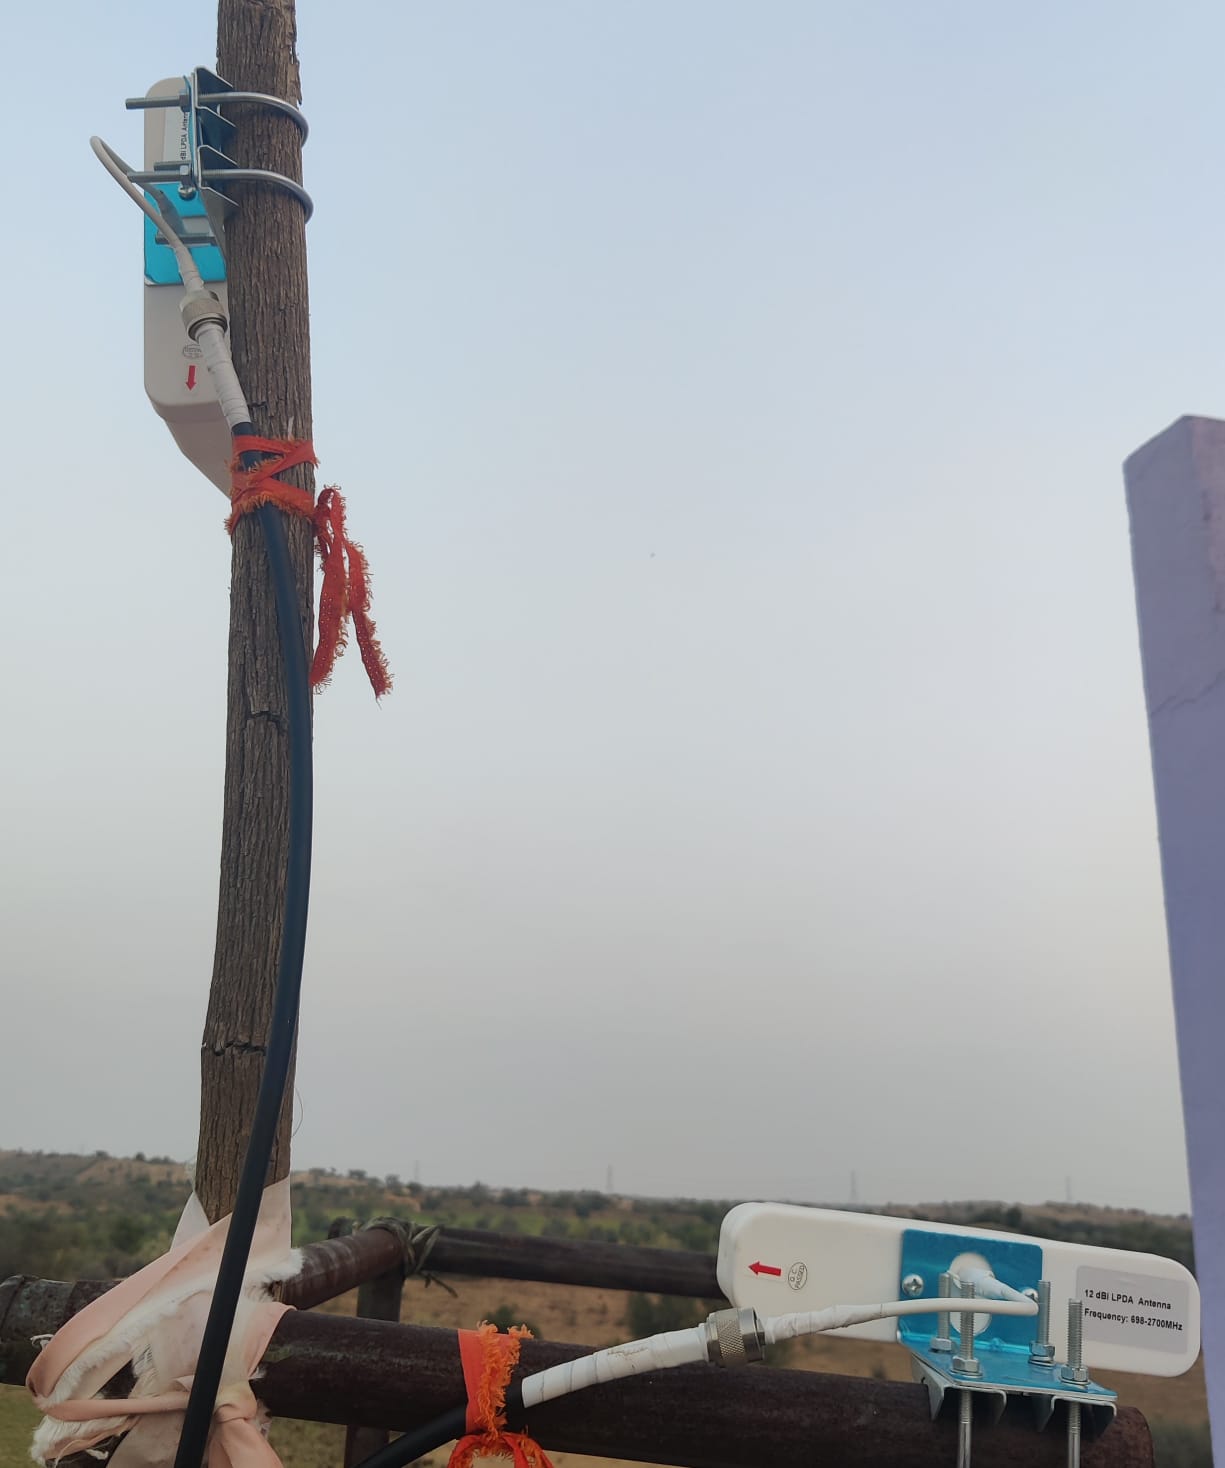
Setting things up / Mounting and connection
You need to mount the antenna at 90-degree polarity OR you can mount them with a good distance between them (if mounted with the same polarity).
Here is how I mounted my antennas:
Testing
After Mounting, I adjusted the antenna while monitoring signal strength metrics (my router has a WebUI that shows these values)
I rotated the antennas in the yaw axis to find a good direction.
After that I adjusted it in the pitch axis to align better with the cell tower radios.
Once you find a good signal, you can permanently fix the antenna at that location.
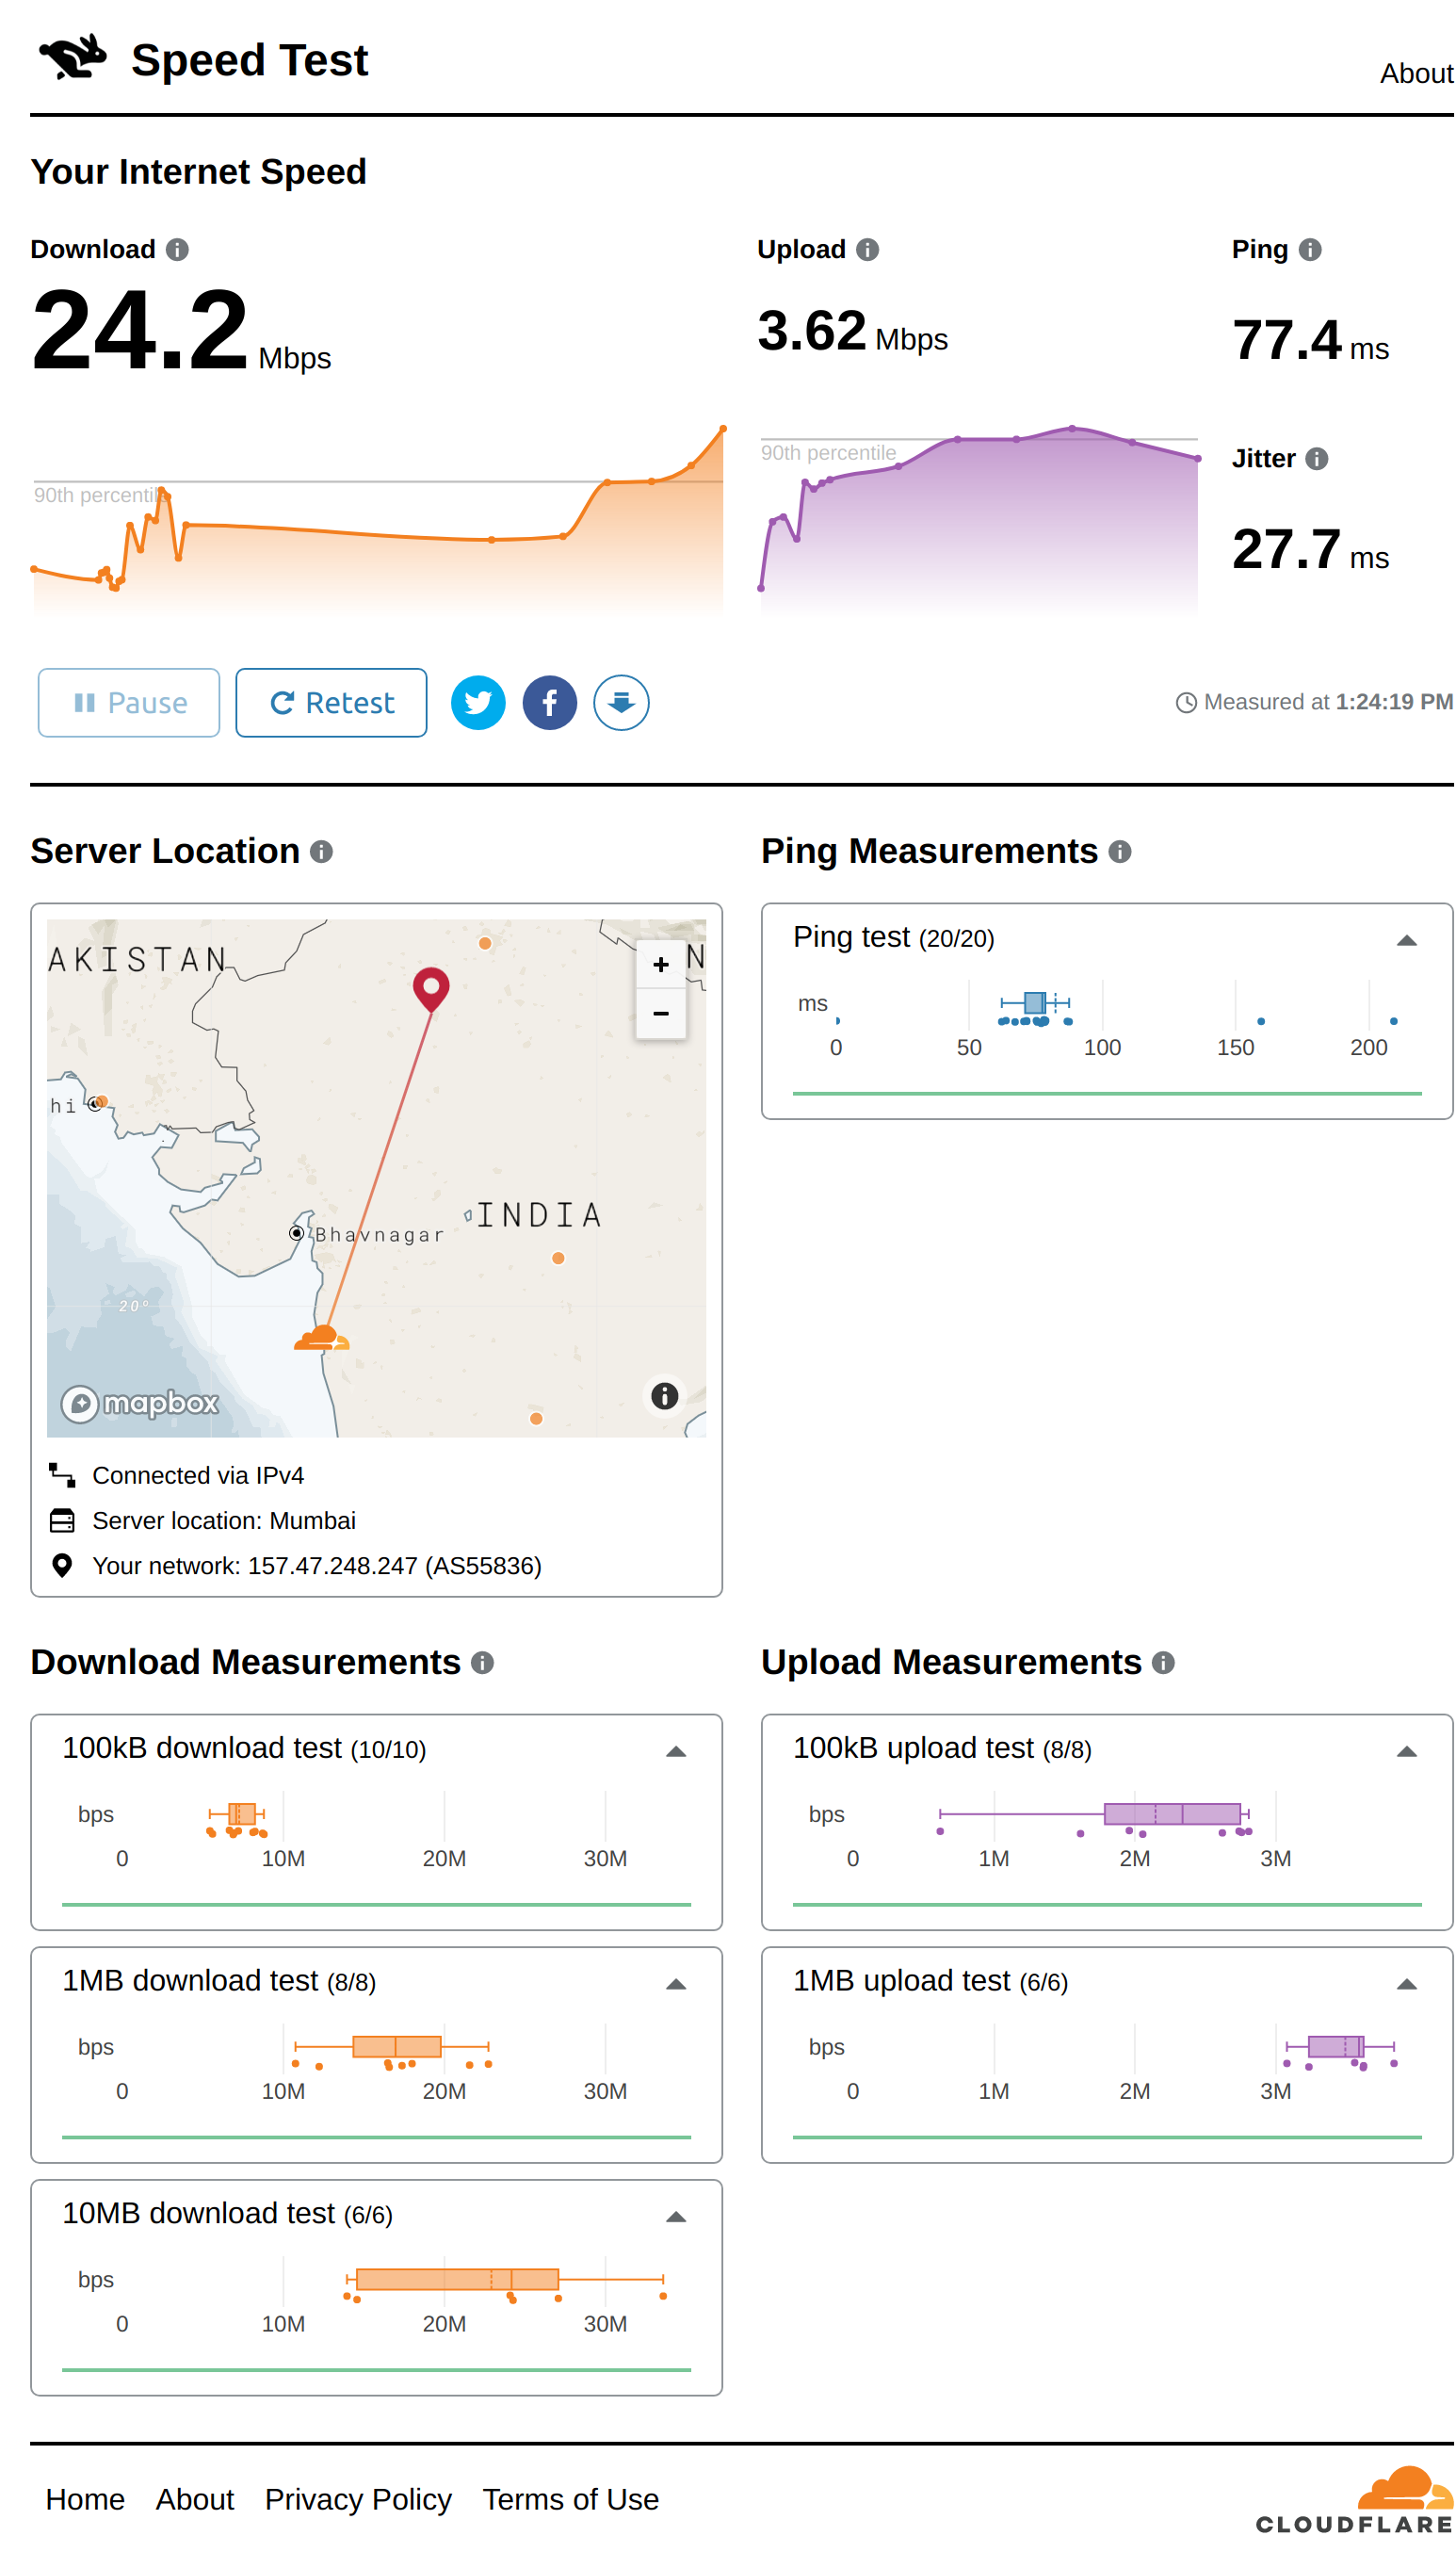
After fixing antennas, do speed tests to check internet speed, jitter and ping. You should see a difference in speed, jitter, and ping with external antennas connected.
If your speeds are the same with and without an external antenna, look at the stability of speeds. With this setup, you should see low ping, low jitter, and consistent speeds.
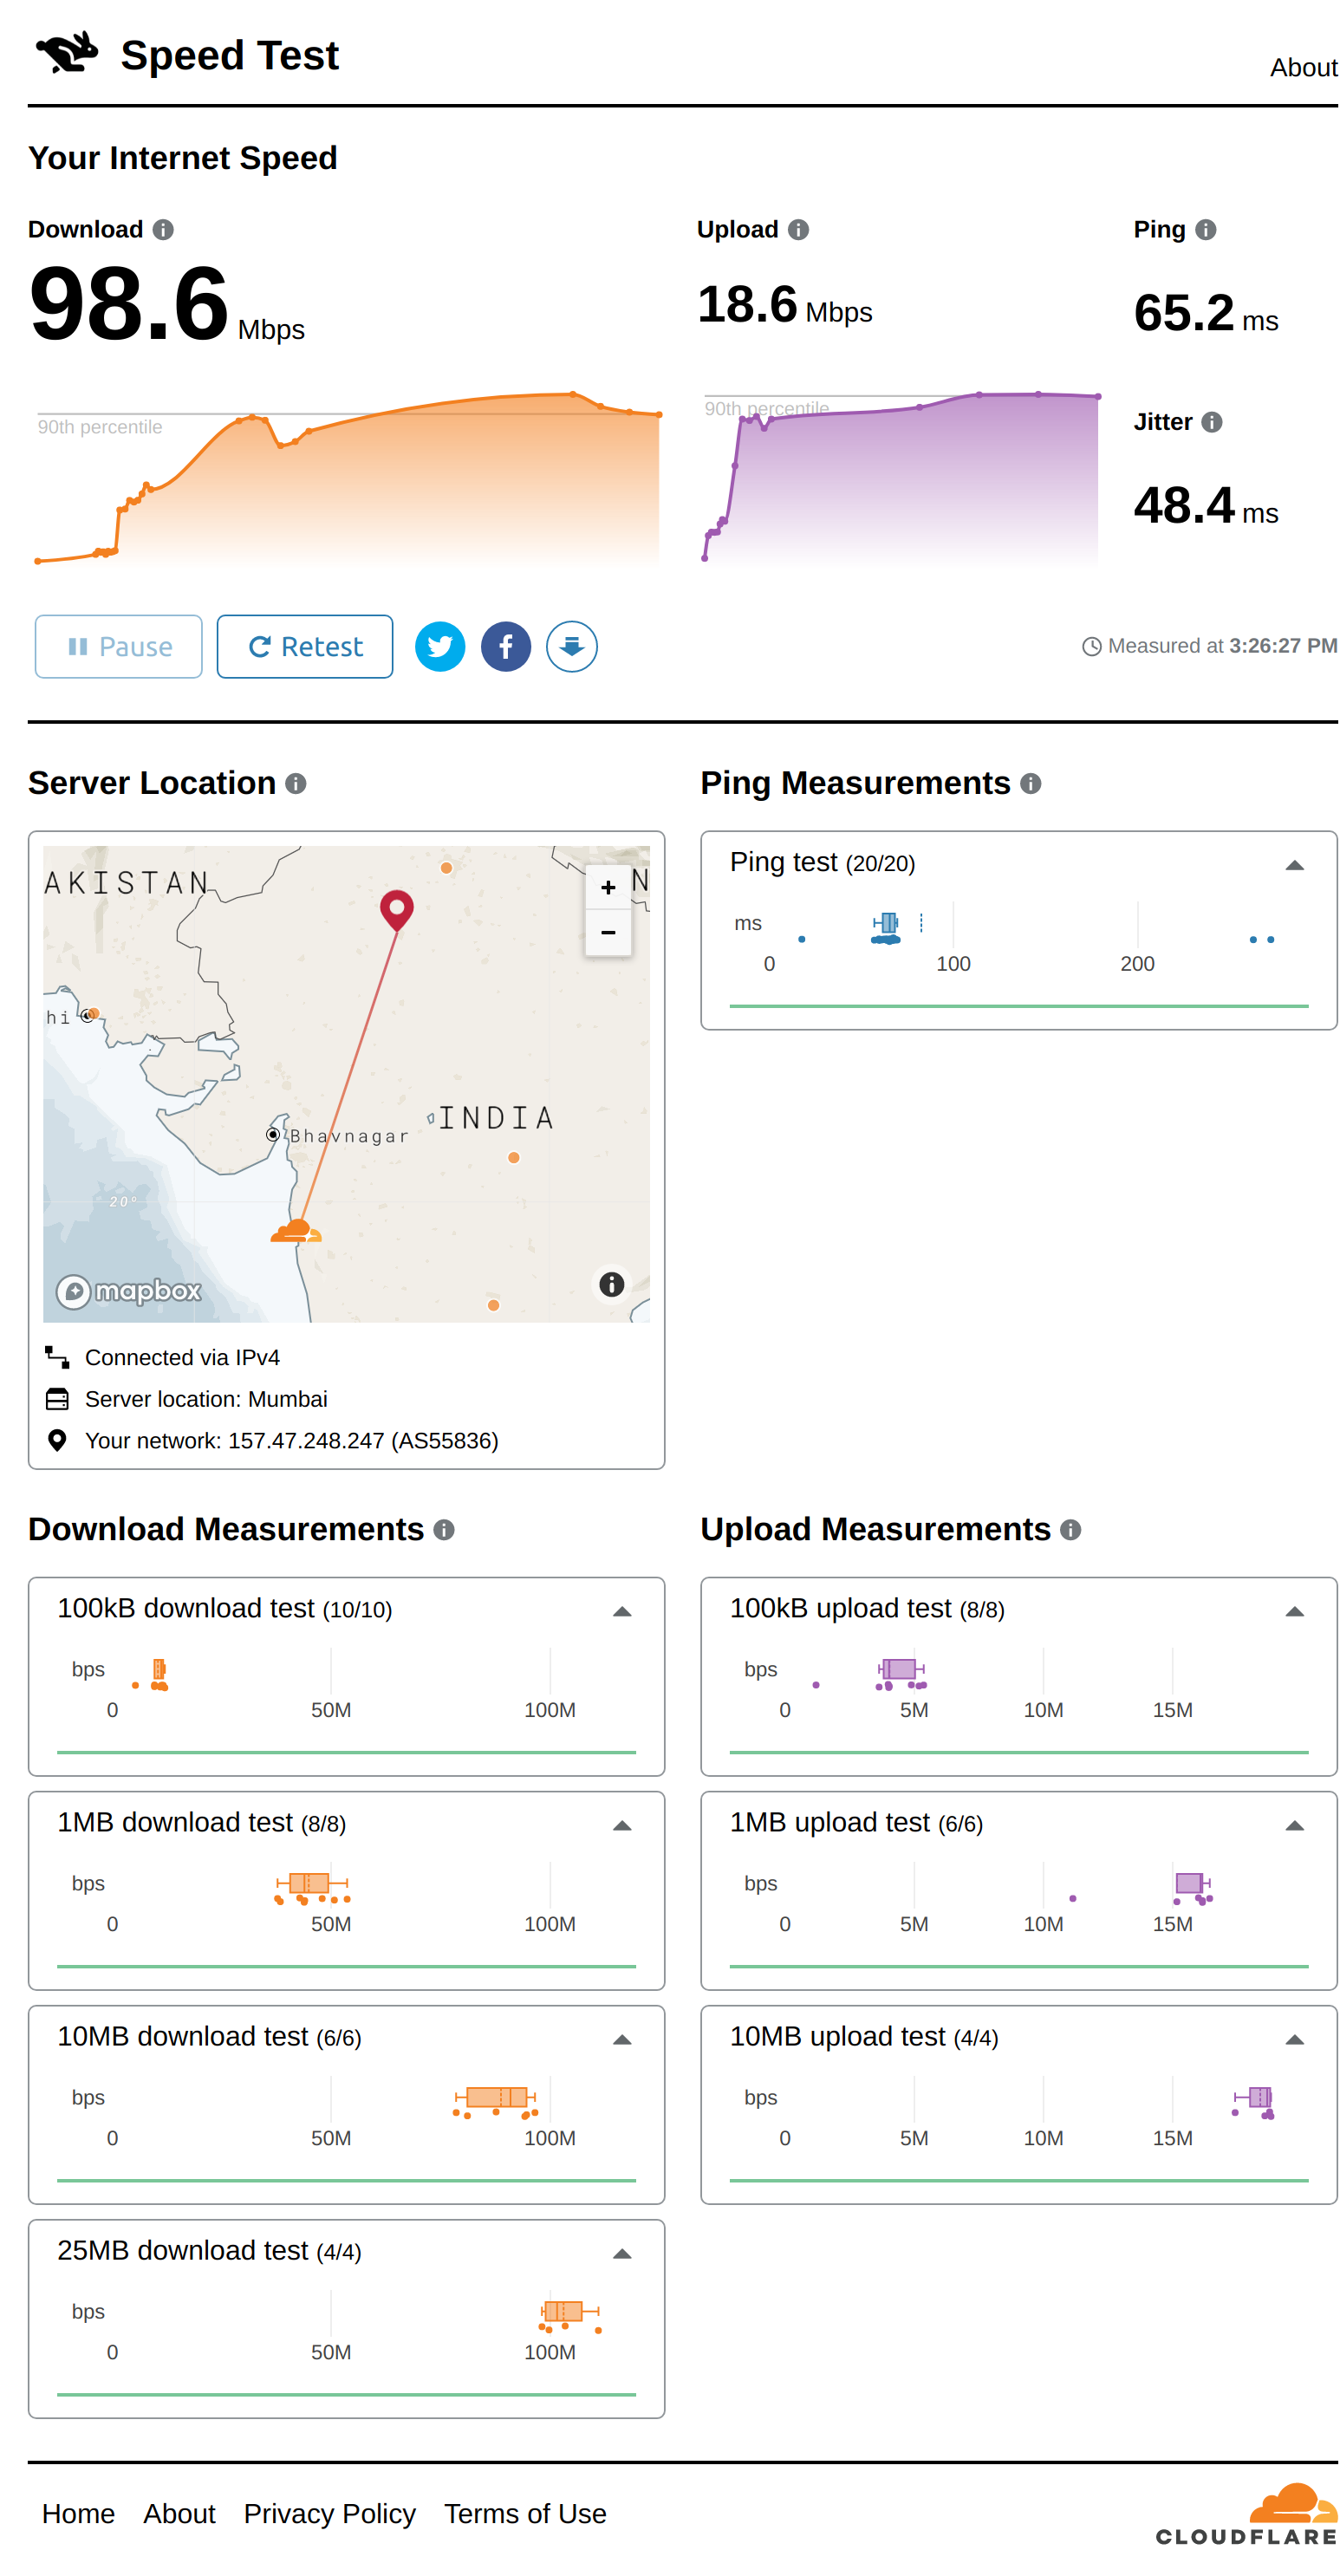
I used speed.cloudflare.com to run the tests, It shows the distribution of measurements instead of a single number.
In a stable connection, the measurement values will be close to each other.
Cost Breakdown
- Router: TP-Link MR600, Paid 9000 INR (~118 USD)
- Antennas: LPDA 12dBi Gain Directional Antenna (2 units), Paid 2000 INR (~27 USD)
- Cable: LMR 400 Cable (2 units, 15 meters), Paid 1800 INR (~24 USD)
- Antenna Mounts (optional): I used an old bed frame to mount my antenna for my setup.
You can weld two pipes in T share to dish tv antenna base for a cheap mount. Designing an antenna mount is an exercise for the reader, if you end up designing one, tweet it to me @electron0zero
My total cost for the setup was around 13000 INR (~170 USD)
Final Results and Speed Tests
NOTE: I am connecting my laptop via ethernet cable for a stable connection between laptop and router. go wired for a better experience during video calls.
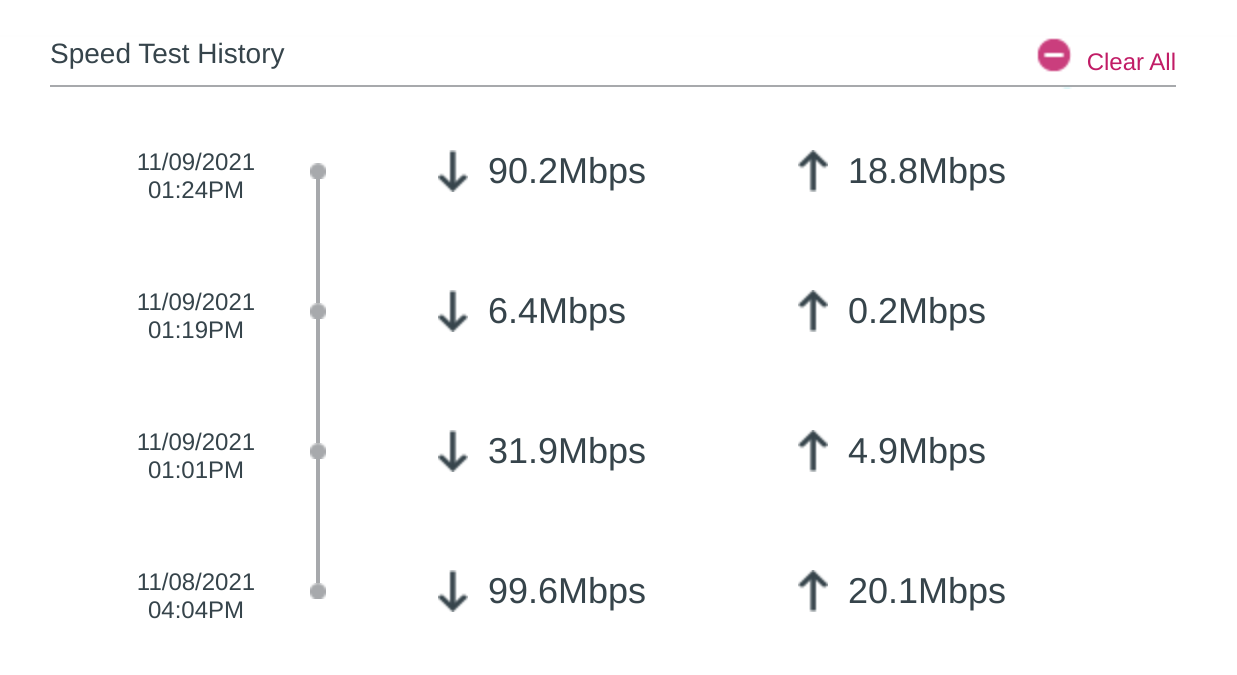
Internet Speeds - 4G on Phone
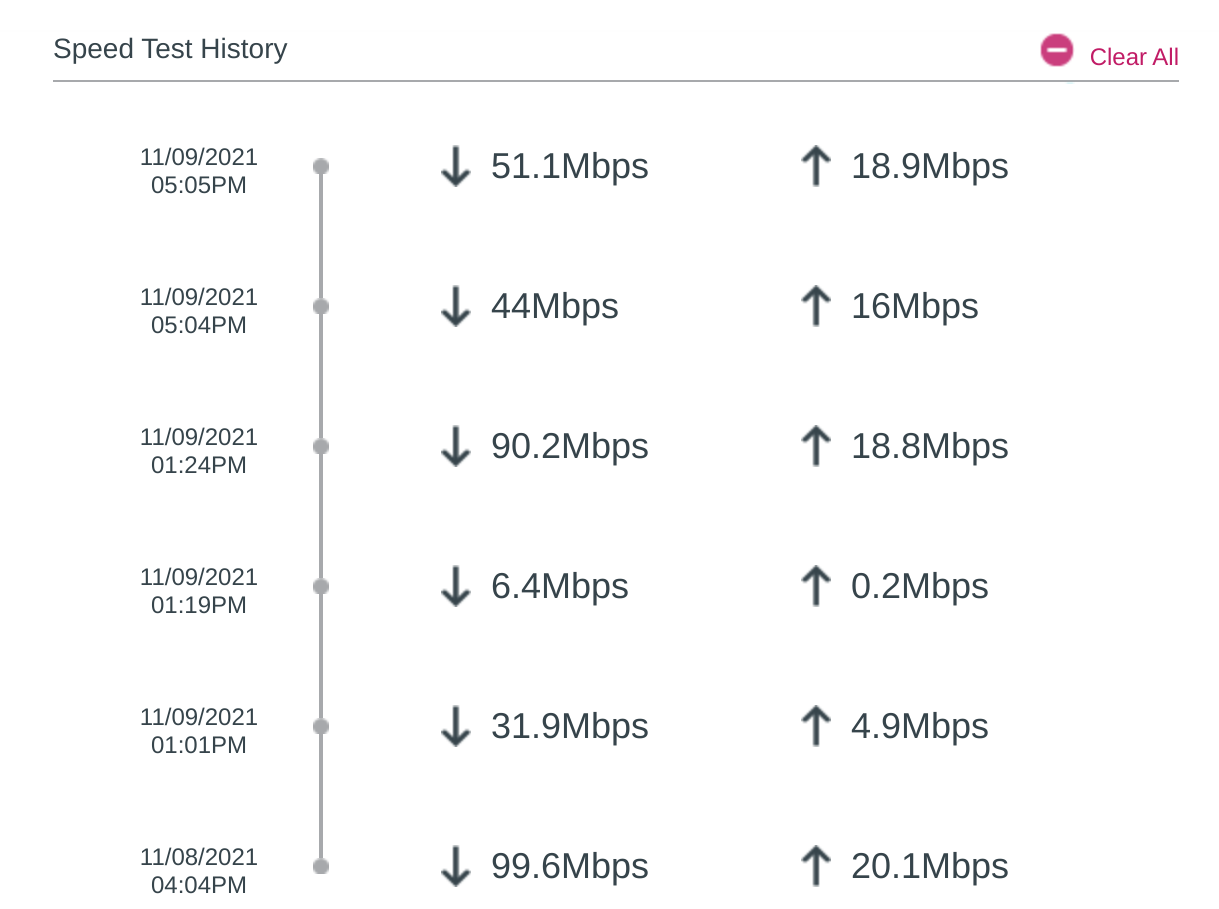
Internet Speeds - With 4G Router and Extenral Anteenas
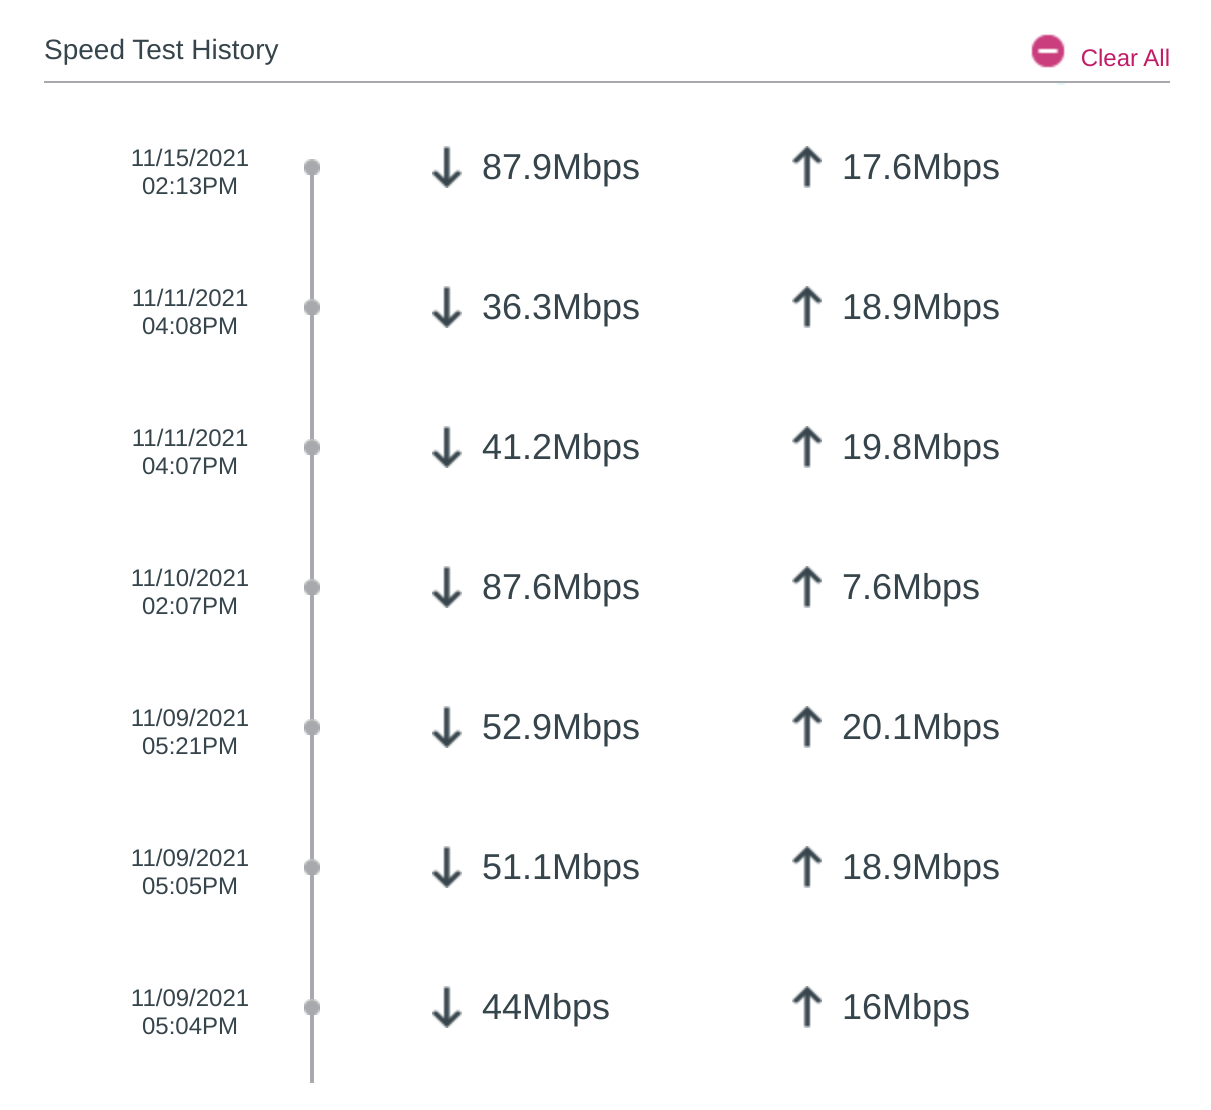
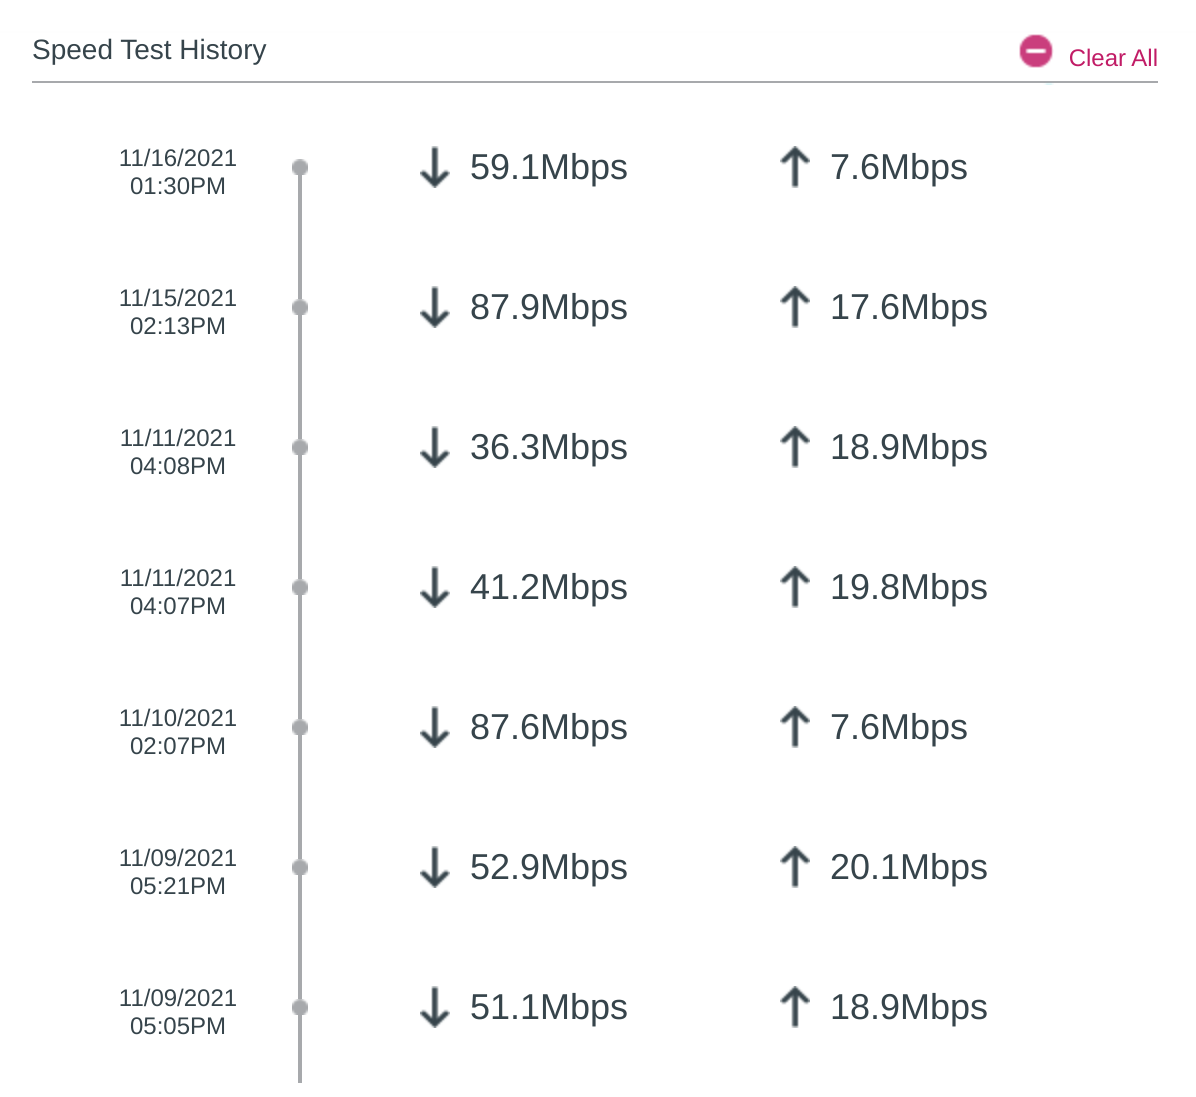
Internet Speeds Tests - Different times
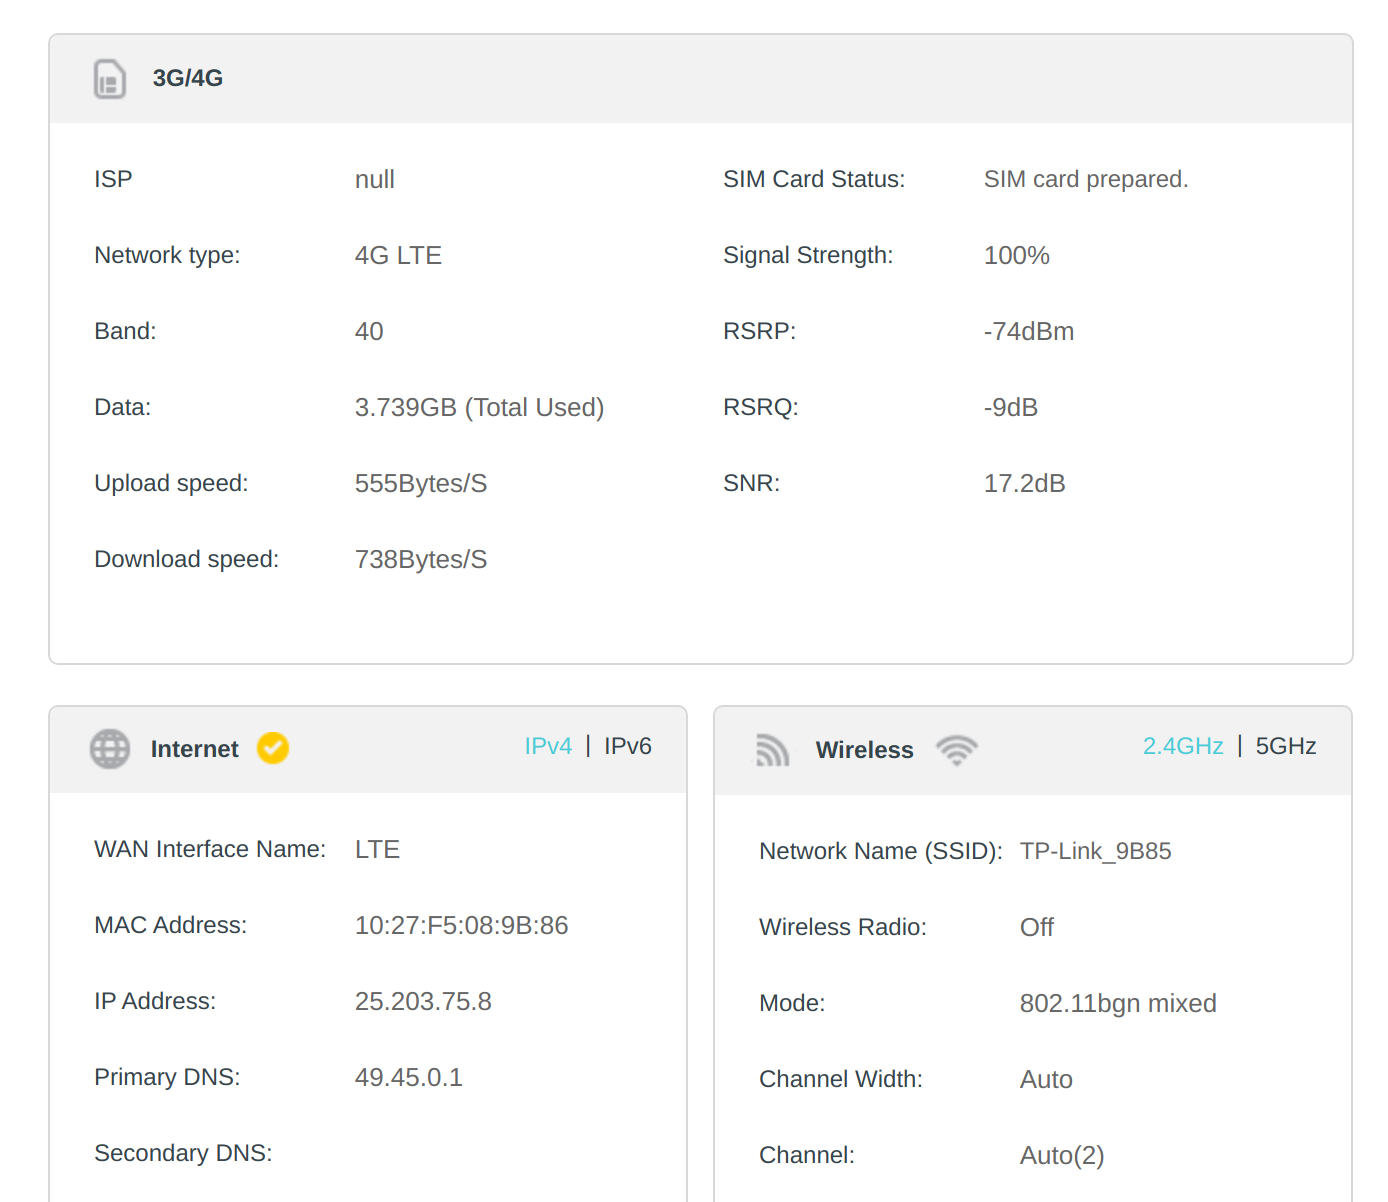
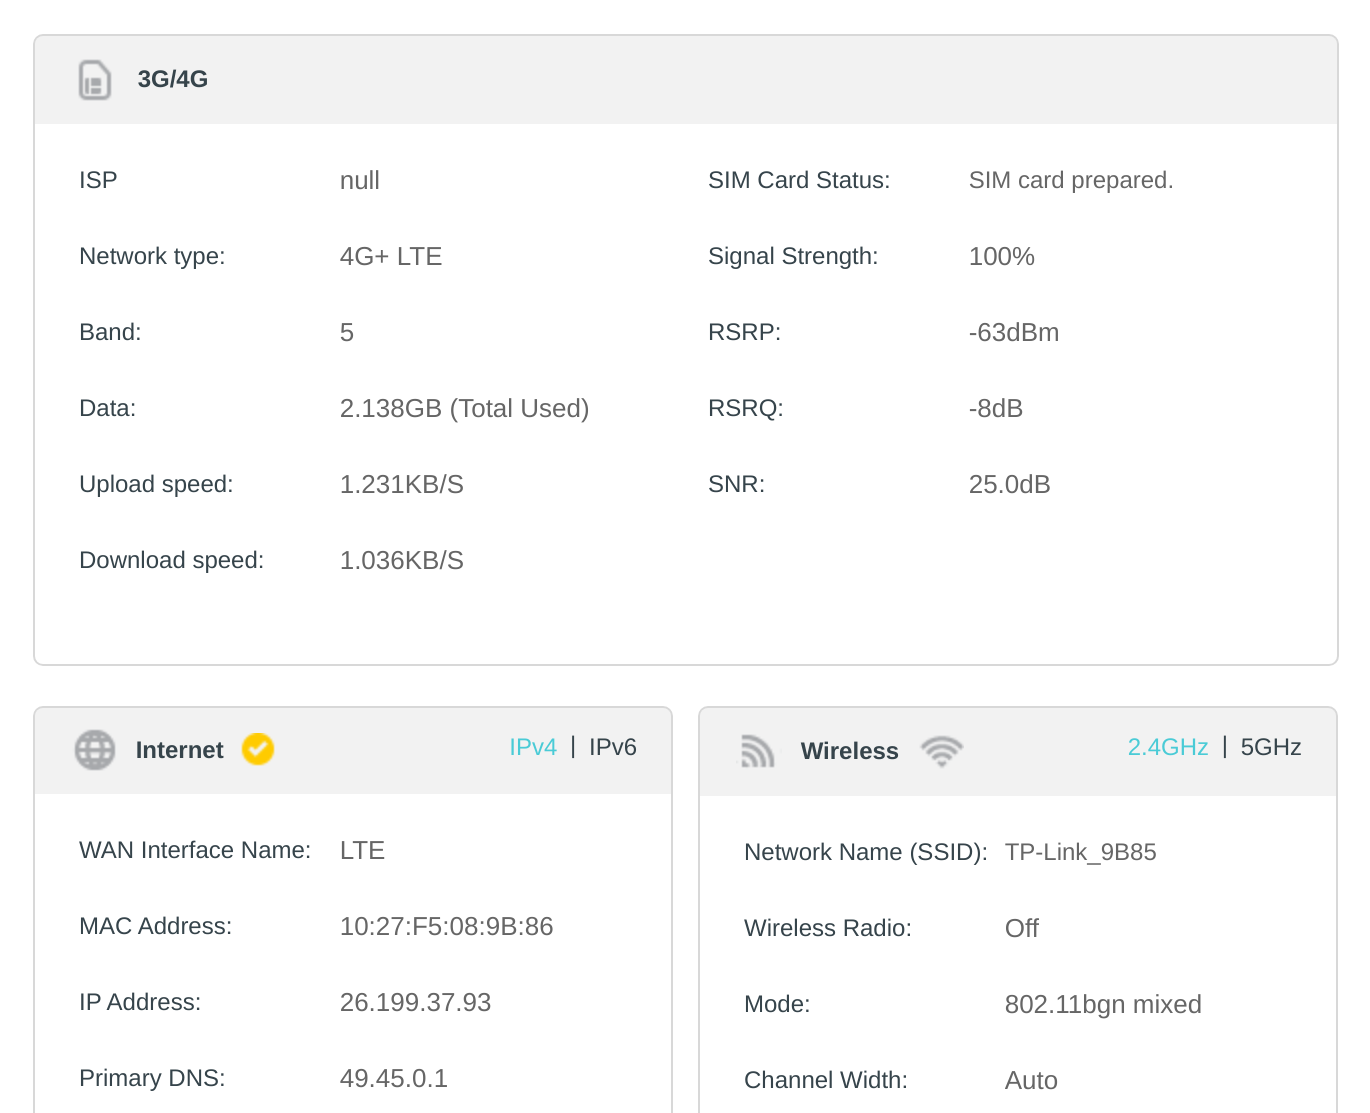
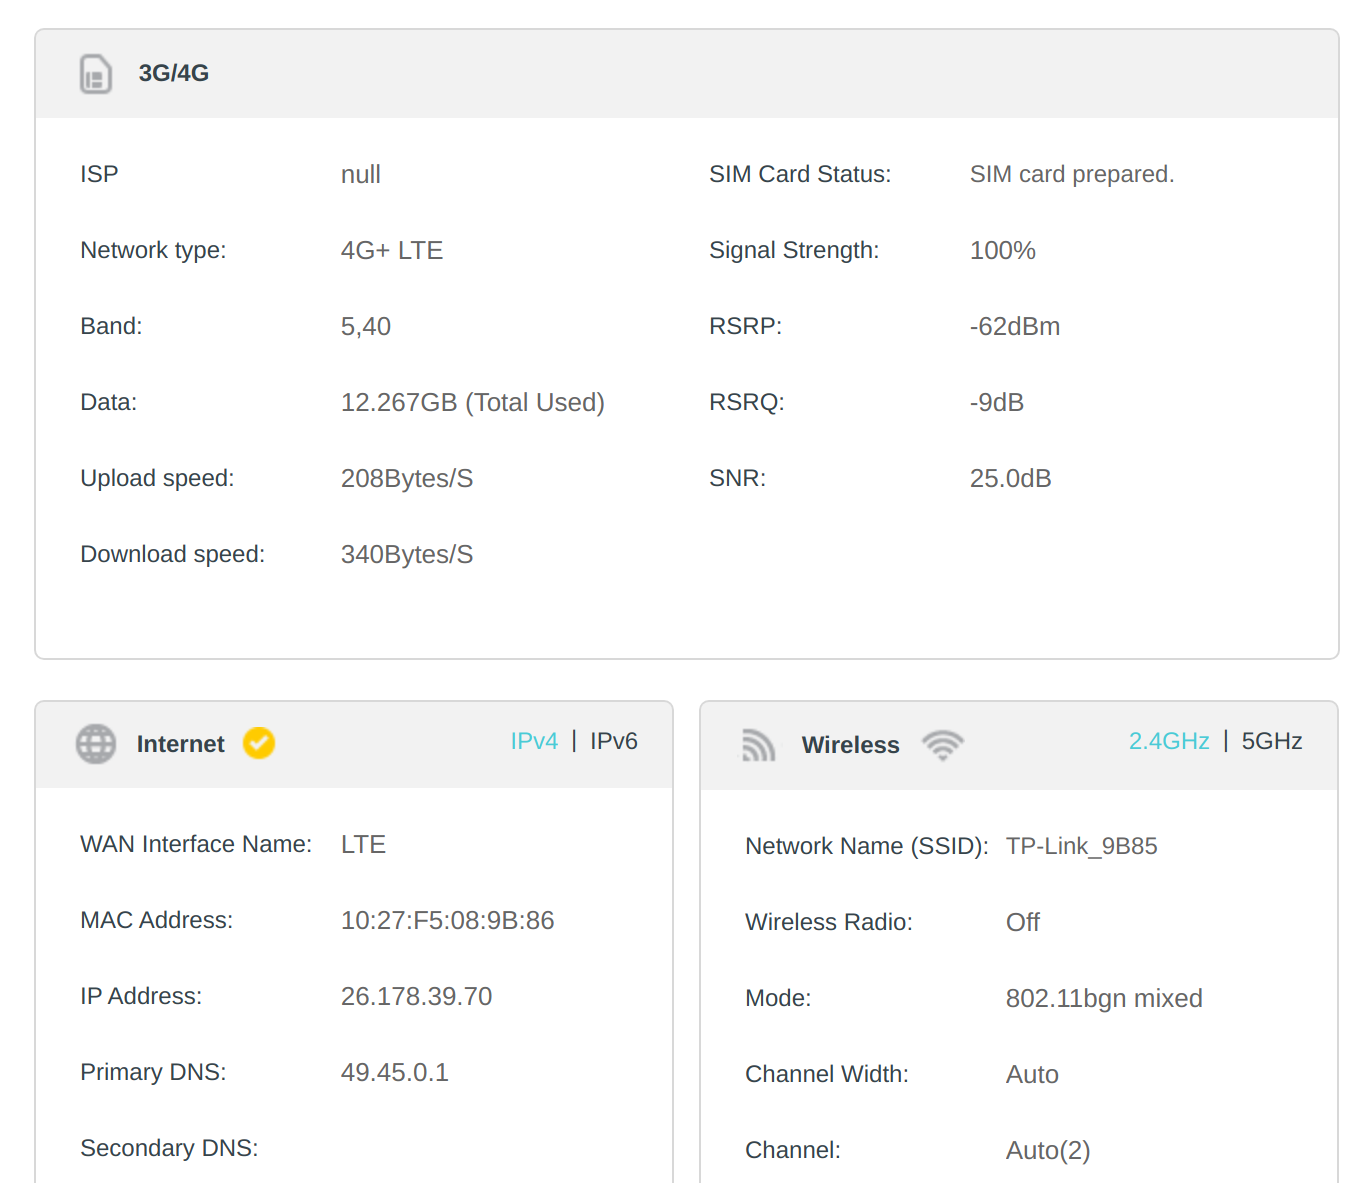
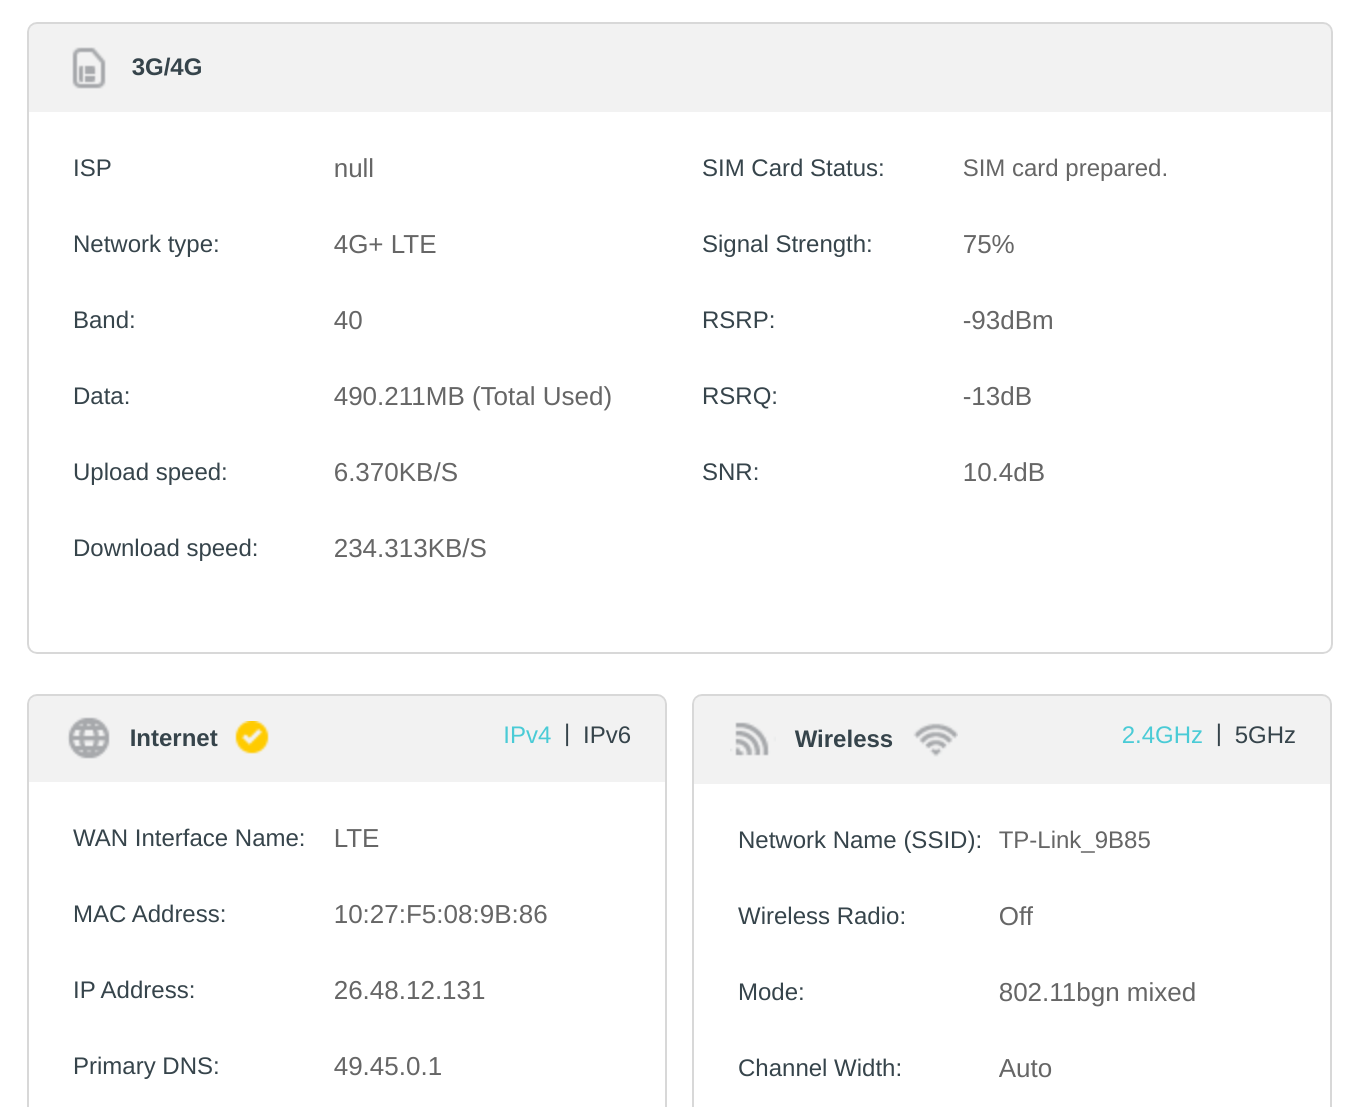
Signal Quality at different times - Router UI
Update (Jul 28, 2022): Patrick Hemmen emailed me about configuring route to I can recommend to configure the router to reduce Bufferbloat and recommened testing Bufferbloat with this tool. if you are following this post, I recommened looking into Bufferbloat as well.
Updatte(July 28, 2022): folks in lobste.rs linked to this amazing and detailed post from Geoffrey Huntley on how he works remotly from his van, check it out.
Closing Note
This setup has been working fine for me, I have used this setup to work 2-3 weeks from remote location.
If you end up building a similar setup, would love to see details and photos of your setup (email me).
Hope this was helpful, and you learned something new today 👋
See discussion on Hacker News and lobste.rs